Tuesday, November 15, 2011

Cake Balls DI - Why did I do this?


Cake balls, cake pops, cakesicles — have you tried them? I know you've seen them. They swept weddings and the internet like a virtual tidal wave over the last few years.


It seems like everyone is getting more and more creative with them. And who cam blame them, they're adorable. When our family's Labor Day Picnic came, I decided to try them myself to see how hard it could be. Hey, if its not too hard, I might be making more of them for future events. So - we all know how to make the cake pops. Instructions are all over the place. A quick google search will yield 15,600,000+ results. Its a pretty straight forward concept, but execution of said concept is slightly more difficult. All the DIY directions I found made it sound SO simple, and fun. Upbeat wording, positive vibes, and a general "you can do it" attitude.


Cake pops are basically little smushed balls of cake and frosting. You bake up a cake, let it cool, tear it into fine crumbs, stir in something to hold it all together, and roll it in balls. Easy, right?


Yea - so, my attempt wasn't a total fail, but you can see from my pictures, I'm a far cry away from Martha. the thing is, they;re a pain in the ass. The crumbling, and mixing part (I heard from actual people, not the DIY utopia online) is the hardest part, wasn't too bad for me. Nevermind the fact that I had to switch bowls half way through because the first one was too small. I also jumped right in with my hands, cause a spoon wasn't cutting it. The hard part for me was keeping the dang things together when I tried to dip them in chocolate. Some websites will tell you you don't have to freeze them. This. Is. A. Lie. Take it from me, it is 100% necessary to freeze the pops before attempting to dip them in hot melty chocolate. Before they're frozen, they're a soft warm dough consistency that just falls off the stick when you dip it. (notice the epic fail blobs above) This is not conducive to a happy working environment. So after a few failed attempts at this, I stuck them in the freezer for a bit. This helped tremendously.


I got them all dipped and even though you can't really tell from the pictures above, the final products were actually kinda nice. I still don't think they're works of art, but they're better than the fail blobs. Now, The point of this post is not to give directions on this DIY, that's all over the place and I dont want to be just another random how to. The point, my friends, is once they were done - I didn't like them. They were a weird consistency and kind of stuck to the roof of my mouth. No bueno. Everyone else seemed to rave over them... was I crazy? Maybe I was jaded because I went through the headache that was making them in the first place. But to me - they're SO not worth it, and even if I outsourced the project, they're expensive and the fact remains I still don't like the taste. Give me a good old fashioned cake or cupcakes any day.

Am I alone in this, does everyone else love them? Or does someone else in the world have a problem with the consistency...?

Thursday, August 4, 2011

So, I'm not Christian Louboutin, but I could be Steve Madden - DIY Glitter Shoes


Hello, my name is Jessica and I am a shoe addict. The first step is admitting it, right? Its true. Like many a woman before me, the prospect of shoes makes me positively giddy. I've been known to do a certain happy dance in the middle of a store if I find a pair that are just right for what I'm looking for. Also, like many a woman before me, I occasionally indulge in habitual shoe ambition. A term I just now made up that refers to me desire for designer shoes, but my inability to obtain such goal. I constantly put things in various online shopping bags with no intention of actually buying them. This is also because I suffer from buyers remorse. Oh what a tangled web I weave. For those of you in academia, I refer now to Adaptive Self-Regulation of Unattainable Goals. True, my shoe fetish is quite superficial in comparison, but the same principles nevertheless.


It is in this self regulation that found these beauties:


Two words: Christian Louboutin. I fell in love. These things, these magical beauties that sparkle every time one moves their foot. How could they be mine?! Well in short, they couldn't. I absolutely could not rationalize spending more than my mortgage on a pair of shoes. That's when it happened. I uttered the ill-advised five word sentence every woman  says in at least once in her lilfe: "I can totally make that." (Thank you How I met Your Mother for the shockingly applicable reference)
 
With determination and this tutorial by my side I was off in search of the supplies and some cheap-ish shoes I wouldn't mind get ruined (in the event I fail). In referenced to the tutorial listed, I skipped on the bead smith and rhinestone tray. They seemed like needless expenses and I could use things I already had in my craft drawer. Even now that its all said and done, I still feel like this chick should have just coughed up the money for the real thing after everything she spent.

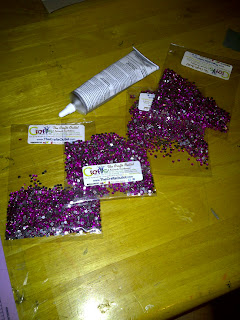
Supplies I used:
Shoes - $20
E6000 Glue - $5
Rhinestones (obviously) - $
Ink Pen (for picking up and sticking on the stones) - $0

I did pick up the glue she recommended, and it worked as she said. I also did not spring for the swarovski crystal rhinestones, again, my frugality got in the way, and I instead found some perfectly beautiful alternatives from Amazon for less than a third of what swarovski crystals would have cost.


I followed the instructions, step by step when I first began. I quickly realized that what I was doing was NOT working.  See photographic evidence below....


The glue was seeping between the rhinestones and they were getting out of place. My personality could not allow for hap-hazard looking rhinestones. I worked sporadically for about a week and it was just getting worse. I then began my own patent method of laying the rhinestones out on my craft table in an acceptable order, picking them up with tape and then applying them to the shoe, all in one bunch. This method worked MUCH better for me.


But, alas, by then it was too late. I already was frustrated beyond belief and did not like how the heel looked due to the placement of rhinestones. Despite encouragement from Jesse and my friends, I knew I wouldn't wear them, so it seemed pointless to finish them let alone start on the other shoe.  Plus, the glue started to get really goopy which didn't help the cause. The lid wouldn't fit on the tube properly and it turned into a total hot mess. I didn't wanna fuss with it anymore.  They got pushed to the side for a while. But like I said, I went the cheap route and was not too upset about the investment lost. So far $20 for the shoes and $20 for supplies is not going to break my bank. Besides, I figured I could use the rhinestones elsewhere in my craft world.


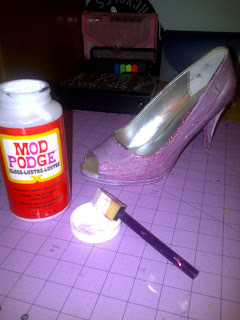
Supplies Round Two:
Shoes - $20
Glitter - $4
Mod Podge - $0 (I already had this, but its pretty inexpensive if you need to buy some)


I removed the rhinestone fail from the shoes and started from scratch. This in and of itself was harder than it sounds, those suckers were on there but good. Which I suppose would have been awesome had they turned out the way I wanted. Oh well. I didn't do anything to prepare the shoes, but thinking on it now, it may have been prudent to rough up the patent surface a little before application. I used a small sponge paintbrush, for no other reason than because that's what I had already. I applied a thin layer of mod podge in small sections on the shoe, adding glitter as I went, until I eventually covered the whole shoe. I did it in small sections in order to control the glitter explosion that somehow occurs when working with this medium. But I'm sure it'd work fine if you did the whole shoe all at once. Once covered entirely, I let it dry for about 2 hours. This was probably more than I needed to, but I wanted to be sure, and I had housework to do anyway.


After I finished laundry and dishes, I came back to the shoes. I shook off excess glitter and assessed the results. The first layer was thin, but that was ok, because I planned on doing at least 2 layers. I re-applied a second layer of Mod Podge directly on top of the 1st glitter layer and repeated the same process of doing a little at a time. This time however, I made the layer a little thicker.


Once this was dry (I let it go overnight just ti be sure) I shook off the excess and checked them out again and decided that 2 layers was enough for the look I was going for. Depending on the kind of glitter, the look you want and overall shoe design, you may want to go 3 layers. Up to you. Once I got to my desired look, I covered the shoes with another coat of Mod Podge, to seal it in. This layer dried fairly quickly, it also serves to make sure no glitter randomly falls off around your house when you walk. You could do this a second time if you wanted, but I felt like once coat was good enough for me, and I didn't want to take a chance that it get too think to see the shine of the glitter.


And there you have it... brand new glitter shoes ala Steve Madden. I'm actually really glad I ended up doing the glitter version. I'll probably be able to wear them more places... plus I'm REALLY proud of how they turned out... not to mention this second go around was much simpler and less frustraiting than my original goal :)

Total Investment:  (including my fail)
approx. $44  WOO HOO

Anyone else re-vamp their DIY projects after an epic fail? Its OK to admit, this is a safe space.
I return, now, to the scholars who discussed the concepts of goal disengagement and re-engagement. A few weeks went by before my goal re-engagement occurred, when I decided I was too stubborn to not finish a project. I was not however too stubborn to own my failures. I had to re-imagine the goal. A quick trip back to the craft store with coupon in hand, I came home with Martha Stewart glitter dust and Mod Podge. I knew I wanted the glitter dust because regular glitter always looks so glob-by to me, and Martha has never let me down with the quality of her craft products. I learned that I'm wasn't Christian Louboutin, but maybe I could be Steve Madden... 

Wednesday, May 18, 2011

Penny Lane is in my ears and in my Eyes

When we first moved into our house, Jesse was working 2nd shift. I hardly saw him at all during the week. By the time he got home I was already in bed. I'm not complaining - I know gotta do what you gotta do, and having a job was pretty important at this particular juncture (being that we just bought a house). I was however, a little nervous - I had lived with my parents all my life up until this point, and rarely was ever alone in the house. So Jesse wanted to make me feel safe when I spent most evenings alone (isn't he a great guy) so we talked for a while about getting a dog. We went over all the pros and cons, time, budget, etc, and he did all his due diligence research (as per the norm). He knew everything there was out there about raising a puppy - literally everything. He would at times be on a forum on his laptop, and simultaneously look up another webpage on his iPhone (no joke). I had almost given up hope on getting a puppy (he seemed so against it, we both worked full time bla bla bla) when one morning I was making breakfast and he said "you wanna get a dog today?". I thought he was kidding - but he had been in touch with a man in Felicity, Ohio about a Boston Terrier female puppy, and he said its mine if I wanted it. Um, duh! So we went out on the craziest trip ever to pick up this dog. We were in my mustang (which historically gets TERRIBLE traction in snow and slush) in the middle of a bilzzard in December to a place 2 hours away we had no clue how to get to. In retrospect, probably not the best timing we ever had, but it was all worth it when we got to the breeder. He handed me this tiny fur-ball of a dog and she immediately climbed up into my neck.


That was it - I was sold. Jesse likes to tell people how he intended on haggling on the price a little with the breeder, but once he saw my face over this little cutie - that was all she wrote :) We named her Penny Lane (partly after the Big Bang Theory - one of our favorite shows, and the more obvious part after the Beatles song). She's our little fury friend, and sure brings some comic relief to our household. For those of you thinking "she said they both worked full time, how can she take care of the puppy during the day?" don't fret - we don't keep her locked up all day. Quite the opposite actually. My Mom, so generously offered to dog sit during the day while I'm at work. She said it works out pretty good because she also baby-sits my Cousin's daughter who LOVES to play with Penny. So never fear - the dog is more than well taken care of :)


I'm not the only one whose heart this dog melted... Jesse fell hook line and sinker to her snuggling....

Monday, May 16, 2011

DIY Diaper Cake


If I haven't told you yet - I love DIY projects, especially if it means I'm going to save money (I'm cheap). My cousin and his wife are expecting their first baby this summer, and so its baby shower time! My aunt is throwing it for her this weekend, and I wanted to get them something they would like that wouldn't also break my budget. I was getting to the shopping a little later than everyone else in our families and the pickings were slim. Anything I would have gotten would have been mashed random things and wouldn't be as cute. I thought about the different things I could get and went over some stuff in my head. I kept coming back to "those diaper cake things", they're simple, cute, and what new parents don't need diapers?! I looked on Etsy to see about buying one already made - one serious case of Price Tag Shock later, I decided to make one myself. (You'll notice some of the same materials I used as the one this chick wanted to charge $99   for! insane)


There are LOTS of instructions on-line about how to make a diaper cake, the concept isn't that hard at all. I, however, did not look it up on-line (because I always think I already know how to do everything). So I just got some supplies and winged it! Again, this isn't the most elaborate diaper cake, I've seen some with pacifiers and lotions and all kinds of crap hanging off of it. But since I wanted it to be a budget cake - and plus I don't really like the look of all kinds of crap, I went simple.

Here are the supplies I got -
• 2 packs of diapers, 90 total
• Ribbon, 1 inch wide, patterned to fit the baby shower theme (jungle) I actually already had this in my scrapbook stash
• pack of 4 receiving blankets
• Paper crinkle to match the ribbon and blankets
• Decorative animals to match the theme


I just jumped in with the rolling - With absolutely no idea how many on each layer I would include... I thought I would figure that out along the way. This wasn't an issue at all - but if you're hyper type-A you may want to plan this out. I ended up using 20 in layer 1, 30 in layer 2 and 40 in layer 3. Worked just fine. To do this, you just take the diapers, one at a time, roll them up tight, starting from the butt of the diaper and rolling it to the waist. The tighter the better. I also taped the diapers in the rolls - using a removable tape I already had as well, they should be able to peel the tape off no problem when they go to use the diapers. These are the inner diapers for the cake and also the most time consuming part.

Once I figured out how many in each layer I wanted, I just stood them up on the table and tied a ribbon around each bundle - scientific I know. Looking at some of the instructions now, I feel like people try to make this step more complicated than it needs to be. Its really pretty straight forward. Once I had all three layers bundled, I stacked them on top of each other to make sure the proportions were correct. Beginners luck - they were.


After that, I simply wrapped the receiving blankets around each layer and pinned them in place, at which point i untied the ribbon already on it and re-tied it on the outside of the blanket - then removed the pins. I found the felt and wooden animal decorations at Michael's for .59 each - you can't beat that, they're so cute. I hot glued them onto the ribbon, careful as to not ruin the blankets.


Then I wanted to add the crinkle paper stuff - also careful not to ruin the blankets or diapers. So, I cut up sone paper plates (also that I already had) and hot glued the crinkle paper to that instead of the diapers or blankets. I thought about not gluing it at all and just setting it around it and that was a disaster - would never have stayed on.  You'll notice on the middle two layers, I only paper crinkled the outer rim of the plates. I figured you wouldn't be able to see it if I did the middle anyway, and hey, waste not want not, right?


Once all the individual pieces were created, all I had to do was stack it. I kind of wish I had a cake platter thing to stack it on, but I tied the ribbon pretty tight so it didn't go anywhere. I also made a topper with the letter "E" for Evan (not pictured), the baby's name just for fun. I'm so proud of how it all turned out, I really hope she likes it. Especially since I had no clue what I was doing! What do you think - is it a winner?


And the best part is - the cost breakdown:

• 2 packs of diapers - $10 (thank you, Kroger digital coupons)
• Ribbon (already had) - $0
• Pack of 4 receiving blankets - $13
• Paper crinkle - $4
• Decorative animals - $1.77
• Tape and Paper for topper (already had) - $0

Total spent $28.77.... Eat your heart out Etsy. I couldn't believe the difference in price - especially since I used some of the same materials I found at Michael's for less than a dollar. These aren't hard to find materials or anything. I mean come on, what is she thinking charging more than triple the cost to make? Ouch.  Total savings of $ 70.23 (not including the shipping cost). 

Tell me about your DIY cost saving projects. What about any others that you were pleasantly surprised at how well they turned out?


-----------------------------------------------------------------------------------


@ achina90 :  This thing isn't letting me reply to your post - I got them at Micheal's, they were in the wood craft section.  Below is a link for the same ones, but they're a little more expensive because they come in packs of 6.  I hope it helps though!
http://www.woodcrafter.com/animals-2.aspx

Tuesday, May 3, 2011

So it seemed like a good idea at the time.... I had all these t-shirts I wasn't wearing, but for some reason could not being myself to throw them away. One was my High School Senior Class shirt. Which literally has not been on my body since then. A lot were from college, with sorority every event having a shirt to go with it, my collection grew exponentially. Albeit I gave several away to underclassmen like hand me downs, I still had about 10 or so. The others were just randoms that I got either on a vacation or fun trip with friends. They all had a story, which is why I had a heard time parting with some of them.  


So it was my Mom's idea to turn them into a blanket. This sounded like a great idea, and it would free up some closet space. Win win. It started out innocent enough. I'd made quilts before, but never with a stretch cotton. So, I researched it on-line to find the best way to do it. I got all the shirt I wanted to use together, I needed 30 squares to make the size I wanted, so that amounted to about 18 shirts (some I used the front and backs of). Once I decided how big to make the squares, the cutting went super quick (if you don't have a rotary cutter, go get one for this, its magical how easy it is). I ended up making them 14' tall by 15' wide. This was to accommodate the images on some of the shirts. I wanted all my blocks to be the same size, but you can totally cut different sizes and piece them together like a puzzle. This just wasn't what I wanted to do. I'd also cut 2 inch strips of a neutral border fabric that I planned to attach on the bottom and right sides of the squares (the strips would come together when i started to sew the blocks together). In hindsight, I wish my border strips were wider, but these worked.


From my research It was pretty clear I'd have to get a soft interfacing in order to keep the shirt from stretching when i sewed it. This might have been the most tedious part. I then sat and ironed all 30 squares with the interfacing. BBBOOOORRRRIIIIINNNNGGGG. It took me three nights to do it. make sure all the squares were straight and nothing wrinkly, nothing was burning in the ironing process, etc. After that super exciting part was done, I sewed my border strips on the bottom part of the shirt square. I sewed on a half inch seam to make it stronger. The last quilt I made i used a 1/4 in seam and it eventually fell apart without much use. I wanted to be able to use this quilt on a regular basis. This eventually made the border strips only 1' wide all around the square. Which is fine, I just liked the wider stripe look better. Just my personal opinion. After all the bottom pieces were sewn, I pressed the seams open, and did the same after the right sides were done. That again was tedious. Ironing is lame :).


Now all I had to do was start sewing the blocks together. This went pretty quick actually. I just had to make sure the colors were spaced properly. I didn't want like 4 white blocks or two green one right next to each other. I made the quilt 5x6 (blocks I mean). I did all the horizontal rows first, then came back and attached each row onto each other. If you're planning on doing this: PIN THE ROWS BEFORE SEWING. You don't really need to pin anything before this point, it'll trim away. I admit, I tried to do it without pinning the rows and ended up getting off alignment and my border strips didn't align properly. So seam ripper to the rescue, and start over. Once I did that little extra step of pinning, everything flew by. Next thing I know, I have a front to my quilt.


I picked a soft flannel plaid fabric for the backing and a medium weight batting to make it extra snugly. I added an additional border around the outside of the front of the quilt in the plaid flannel to make it feel like it matches. In order to put it all together, I laid the front face up, then pinned the backing on top of it, followed by the batting. Sew it all around leaving about a foot open on one side. This is so you can turn it right side out. Then you just hand sew up the hole you turned it through. I also tacked down the three layers in order to keep it from getting all matted when I use and wash it. I did this with just a few stitches at each of the corners of the blocks in the seams. I did it this way so you cant see the stitches from the front. After all that's done, I washed it just to get rid of excess strings and to fluff up the interfacing a little. And Viola, a brand new planket that no-one else has! It was definitely a labor of love, but I really am happy with the result of it. Although, I probably won't be trying to make another one any time soon :)

Tuesday, April 26, 2011

Me and My Big Ideas

Nobody ever told me adulthood was fun. All I ever heard was college is the best years of your life. Don't get me wrong, I had a blast (and in some cases a blast and a half) I traveled, skipped class, slept in, quit jobs on a day's notice, went to bars on a Tuesday nights, and wore super short mini skirts with leg warmers, you know, all that stuff you can't do as an adult (unless you don't care about being taken seriously, of course). I wouldn't change a thing about it, but I also don't want to repeat it. The only thing I think I'd like to hang on to is that early 20's metabolism. Not that I'm saying I'm old or anything, and I'm willing to believe that is 30 years or so my opinions might change. I'll have that "things not to miss out on" conversation with a child of my own. But right now, I'm fully digging on being a big girl.

Please allow me to introduce myself. I’m a closet perfectionist with a quick wit and a terrible sense of direction. A student of media communication (and an eternal enthusiast) I often use quotes and references from pop culture to get points across. I am more often than not sarcastic and if I watch too much Tosh.0 my jokes tend border on sexist. Am I'm O.K. with that. Jesse (my boyfriend) once said that Women are inherently better at Men at some things, and Men better than Women at others, so to call us purely equal is a bit counter-intuitive. Realistically, Men can't give birth, and Women can't pull of a 5 o'clock shadow and still be sexy. Instead mutual respect and support for each other is more realistic. I like his take on that, if that makes me anti-feminist then I'm O.K. with that too. I'm a realist at heart. As your stereotypical red-head I am known to be more stubborn than I should be, and patience runs thin. Anyone who knows me knows that they shouldn't tell me I can't do something unless they want to see me stomp off and do it just to prove that I can. This applies to all heavy lifting that a woman my size has no business doing, as well as *almost* single handily creating and piloting a successful campus wide fund-raising and PR program. I've been told that once I set my mind to something I attack it with a Chuck Norris like intensity. I take that as a compliment. Sure, sometimes it might get done "wrong". For example, I have a book case that's held together with mail glue and duct tape, because I couldn't find the nails. But all be damned if it isn't done. For the most part though, I'm pretty level headed and rational. I can usually keep my neuroses in check. But when I'm pushed too hard, I push back. Jesse calls it letting the Red out. It doesn't come out often, but when it does he knows to be on hand with a coke and some form of chocolate covered peanut butter treat. Its the Mr. Hyde version's kryptonite.

In the last two years, I've earned my master's degree, began my career in the corporate world, and bought a house with the love of my life. We're property owners now... who knew? Right now, my life is pretty friggin' sweet! That's not to say it doesn't involve a lot of work to maintain and balance. But that's part of the fun isn't it? I'm not just talking about housework. Home upkeep is just a small portion (although, for the life of me I'll never understand how 2 people use as many dishes as we do). Balancing work and home life, relationships (both personal and professional) and every once in a while get to sit and enjoy the moments. Jesse and I always seems to have time to sit together on the couch and watch whatever TV show we've gotten into on Netflix (my favorite wind-down tool). Again, I'm not delusional enough to think that wont change at some point, life throws stuff at us that will make us re-arrange our priorities. But I also believe that we are a good enough team to figure those out when they come as well. All and all the only thing I really miss about the "good old college days" is the writing (I never thought I'd say that). That's why I started this blog. I don't know if I'll love it or think of it like a chore, but that's pretty common with most of the things I get myself into. Just another one of my big ideas.